I just bought two TI CC2650 LaunchPads from Mouser, which feature the recently released TI CC2650 System-on-a-Chip (SoC), and I thought I could write a simple tutorial to help people get started with the LaunchPad and Contiki OS on Mac OS X.
The CC2650 SoC integrates an ARM Cortex-M3 microcontroller together with a Bluetooth Low Energy (BLE) and IEEE 802.15.4 radio chip. This SoC brings new opportunities for wireless devices and research. For instance, Thingsquare uses BLE for proximity control using the SensorTag, another TI CC2650-based evaluation board. Other researchers are studying how to run RPL over BLE, see this demo and this paper.
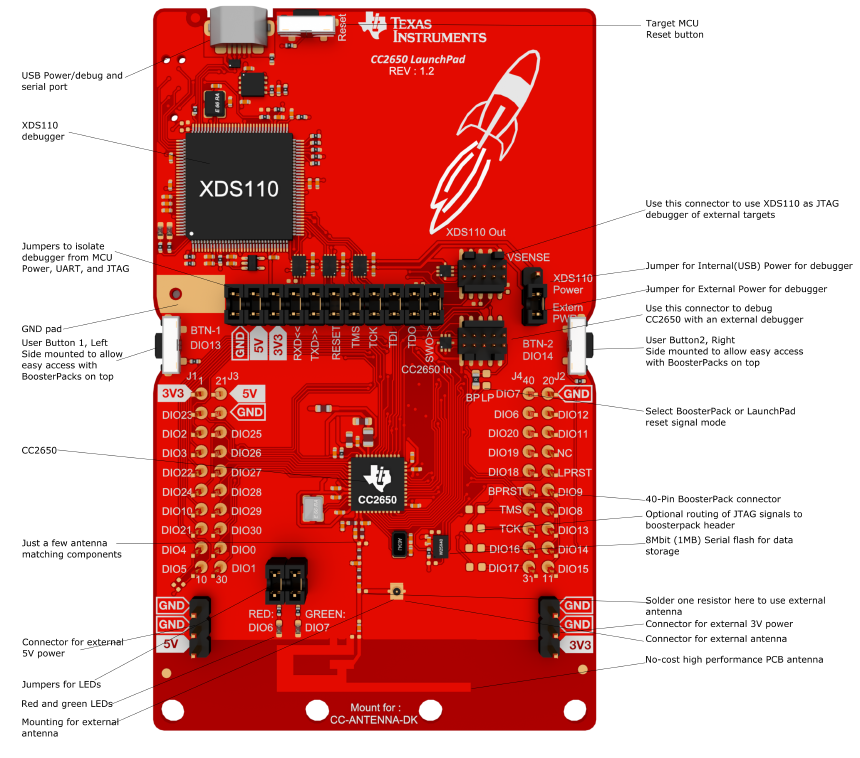
The following picture obtained from the TI CC2650 LaunchPad Quick Start Guide details some of the LaunchPad features.
Requirements
Everything that you need to get started with the TI CC2650 LaunchPad and Contiki is enumerated in the Contiki TI CC2650 platform’s README. Here, you can find the commands to install all these requirements on Mac OS X.
First, clone the Contiki GitHub repository and get its submodules. Specifically, the CC26XXware and the CC2538-bsl script submodules are required.
$ git clone https://github.com/contiki-os/contiki
$ cd contiki
$ git submodule update --init
The previous commands should download the latest Contiki and its submodules. If you already have a previous clone of Contiki, you can update it with git pull. If you have a Contiki fork that is not up-to-date you can run the following commands:
$ git checkout master
$ git fetch upstream
$ git merge upstream/master
$ git push origin master
Being upstream the original project repository. If you do not have any upstream added, you can add it like this: git remote add upstream https://github.com/contiki-os/contiki.
Then, if the submodules in your fork or clone are not up-to-date, you can update them with the following command:
$ git submodule foreach git pull origin masterBy now, you should have the latest Contiki, CC26XXware, and the CC2538-bsl script that you need to upload an image over the serial port to the LaunchPad. However, you may still not have a toolchain to build the firmware. To this end, you need the GNU Tools for ARM Embedded Processors. On Mac OS X to install these tools, you can use Homebrew as follows:
$ brew cask install gcc-arm-embeddedAt the time of writing, this installs version 5.2.1.
$ arm-none-eabi-gcc --version
arm-none-eabi-gcc (GNU Tools for ARM Embedded Processors) 5.2.1 20151202 (release) [ARM/embedded-5-branch revision 231848]
Copyright (C) 2015 Free Software Foundation, Inc.
This is free software; see the source for copying conditions.  There is NO
warranty; not even for MERCHANTABILITY or FITNESS FOR A PARTICULAR PURPOSE.
Finally, you will also need to install SRecord. You can also use Homebrew for this purpose:
$ brew install srecordFlashing the LaunchPad with TI SmartRF Flash Programmer
Most likely, your LaunchPad comes pre-programmed with factory firmware that does not have the ROM bootloader enabled. As a consequence, before you can use the CC2538-bsl script to programme the LaunchPad over serial, you will need to flash first the CC2650 with a new image that enables the device bootloader. To do that, you will need to modify the ccfg.c file that you can find in:
contiki/cpu/cc26xx-cc13xx/lib/cc26xxware/startup_files/
Specifically, you need to enable the ROM bootloader and its backdoor, define the pin state to activate the bootloader backdoor, and the DIO number of the backdoor. You can do that by looking for the bootloader definitions in the ccfg.c file and modifying them as follows:
#define SET_CCFG_BL_CONFIG_BOOTLOADER_ENABLE            0xC5       // Enable ROM boot loader
#define SET_CCFG_BL_CONFIG_BL_LEVEL                  	0x0        // Active low to open boot loader backdoor
#define SET_CCFG_BL_CONFIG_BL_PIN_NUMBER                0x0D       // DIO number for boot loader backdoor
#define SET_CCFG_BL_CONFIG_BL_ENABLE                 	0xC5       // Enabled boot loader backdoor
With these modifications you are setting the button 1 (DIO13) to enable the bootloader. If you prefer for any reason to use button 2 for this purpose, simply set:
#define SET_CCFG_BL_CONFIG_BL_PIN_NUMBER 0x0E // DIO number for boot loader backdoorOnce, you have done these modifications and you have all the requirements, you can compile a new image to flash the TI CC2650 LaunchPad. For simplicity, I will use in this post the cc26xx-demo.c example in Contiki. You can compile the image for the LaunchPad as follows:
$ cd contiki/examples/cc26xx/
$ make BOARD=launchpad/cc2650 cc26xx-demo
After this, you should be able to see the next files:
$ ls cc26xx-demo.*
cc26xx-demo.bin			cc26xx-demo.c			cc26xx-demo.elf			cc26xx-demo.hex			cc26xx-demo.srf06-cc26xx
Basically, the cc26xx-demo.elf or cc26xx-demo.hex is the image that you need to flash the TI CC2650 LaunchPad. To do so, you will need the TI SmartRF Flash Programmer, which you can download for free from TI. Download the second version (v2). You will need to first sign up and then fill a form to download the software. Unfortunately, TI SmartRF Flash Programmer is only available for Windows, so you will need to either use a Windows machine or a virtual machine with VMware Fusion or Parallels. A priori, you could also use VirtualBox. However, with VirtualBox I had a problem when upgrading the firmware in the XDS110 MCU, which is most likely the first thing you will have to do when using for the first time your LaunchPad together with SmartRF Flash Programmer.
Once you have TI SmartRF Flash Programmer up and running, connect your LaunchPad to your Windows (virtual) machine and you will see a device appearing in the left pannel of the application. Click on it and update if required the XDS110 firmware. Then, connect to the LaunchPad using the same pannel. Once the connection is successful, select the image to upload to the LaunchPad, i.e., either the cc26xx-demo.elf or the cc26xx-demo.hex files. Then, mark the three checkboxes available in the application, i.e., erase, program, and verify. Click play and wait to get the green bar reporting success. Congratulations you have programmed your LaunchPad for the first time!
Flashing the LaunchPad with the CC2538-bsl script
Now that your LaunchPad is running a firmware that has the the ROM bootloader enabled, you should be able to programme the LaunchPad over serial using the CC2538-bsl script on Mac OS X. Note that you should have the CC2538-bsl script dependencies installed.
First, you need to manually enable the bootloader backdoor. To do so, connect your LaunchPad to your Mac OS computer, press and hold Button 1, reset the LaunchPad, and then release Button 1. Now, you can directly programme the LaunchPad as follows:
$ make BOARD=launchpad/cc2650 cc26xx-demo.uploadIf by any chance, you are getting an error such as ERROR: Timeout waiting for ACK/NACK after 'Synch (0x55 0x55)', you may need to reduce the baudrate by modifying the BSL_FLAGS of the CC2538-bsl script either in platform/srf06-cc26xx/Makefile.srf06-cc26xx or in platform/srf06-cc26xx/launchpad/Makefile.launchpad to:
BSL_FLAGS += -e -w -v -b 115200Connecting via serial port to the LaunchPad
To connect via serial port to your TI CC2650 LaunchPad, first you need to see the serial port the LaunchPad is connected to. To do that just run:
$ ls /dev/tty.usbmodem*
/dev/tty.usbmodemL1002961	/dev/tty.usbmodemL1002964
In my particular case, the LaunchPad is connected to the /dev/tty.usbmodemL1002961 serial port. Then, I can use the serialdump-macos tool of Contiki to connect serially to the LaunchPad with the following command:
$ make login PORT=/dev/tty.usbmodemL1002961Running that command you should see something like:
$ make login PORT=/dev/tty.usbmodemL1002961
using saved target 'srf06-cc26xx'
../../tools/sky/serialdump-macos -b115200 /dev/tty.usbmodemL1002961
connecting to /dev/tty.usbmodemL1002961 (115200) [OK]
-----------------------------------------
Bat: Temp=22 C
Bat: Volt=3339 mV
Starting Contiki-3.x-2405-g562a33a
With DriverLib v0.44336
TI CC2650 LaunchPad
 Net: sicslowpan
 MAC: CSMA
 RDC: ContikiMAC, Channel Check Interval: 16 ticks
 RF: Channel 25
CC26XX demo
-----------------------------------------
Bat: Temp=26 C
Bat: Volt=3292 mV
Left: Pin 0, press duration 52 clock ticks
Left: Pin 0, press duration 121 clock ticks
Left: Pin 0, press duration 277 clock ticks
Long button press!
I hope this helps you!